Author: Rosie

  • The process of getting my fingers tattooed (it hurt a lot)

    The process of getting my fingers tattooed (it hurt a lot)

    When researching whether or not I should get my finger tattoos, I noticed only a few Reddit threads and very few posts online showing the healing process.

    In the end, I went through with it and have quite a few things to say about the whole experience!

    Looking for a tattoo artist who can do finger tattoos.

    I wanted to find an artist who could do the job well! The design seems simple at a glance, but when you consider how many straight lines are involved, it becomes complicated. I also didn’t realize how difficult of a canvas fingers are (I guess it’s not surprising, it’s skin on bones)!

    This is the picture I sent in the artist inquiry to show my design sketch and the size of the working space.

    hand next to a ruler with digital drawing of the tattoo design

    The first thing I looked for were tattoo portfolios and profiles of artists who had already done many finger tattoos. I wanted someone who had experience and knew how finger tattoos heal.

    Did getting my finger tattoos hurt?

    YES. Looking through Reddit threads, I knew it was going to hurt. I was really nervous about it.

    If I had to compare the pain to a tattoo I already have, I would line it up with the tattoo that comes pretty close to my armpit.

    upper arm tattoo with the armpit area circled with text overlayed "this part really hurt!"

    Tattoos typically feel like slightly uncomfortable cat scratches, but this felt so much worse. The vibration that feels directly on the bone paired with the sharp pain from the needle is not for the faint of heart.

    I also noticed that the artist used a smaller needle which may have contributed to the sharp feeling!

    The first pass at my finger tattoos

    I got them done on December 29th, 2023.

    Stencil placement took as long as the tattoo time. A design with straight lines means that lining them up with my fingers in different positions could lead to complications!

    Once we had the stencils on, I made sure to look at them from different angles and at different degrees of my fingers being bent.

    Once we were set, the process of getting them tattooed only took about 15 minutes.

    The artist kept going over some spots, and I later found out my fingers weren’t taking the ink very well. I think the tattoo lined up with a few wrinkles on my fingers, which provided mixed results in the end.

    fresh tattoo, before peeling

    Healing Process

    The artist gave me a nitrile glove to wear for protection instead of wrapping my fingers up with saniderm or bandages. I was instructed to leave it on for at least an hour before removing and washing with unscented soap.

    It felt uncomfortable to move my fingers for a whole week or so after I got the tattoos. I avoided moving them as much as possible until they were completely done healing.

    After 12 days, it started peeling. Normally when tattoos peel, it reveals a layer of the ink still in the skin. When this tattoo healed, I realized a significant chunk of the ink had fallen out from my pointer finger. Later, more fell out of my pointer and middle finger.

    This was pretty devastating, but the artist had told me that this was a possibility and I wasn’t caught off guard.

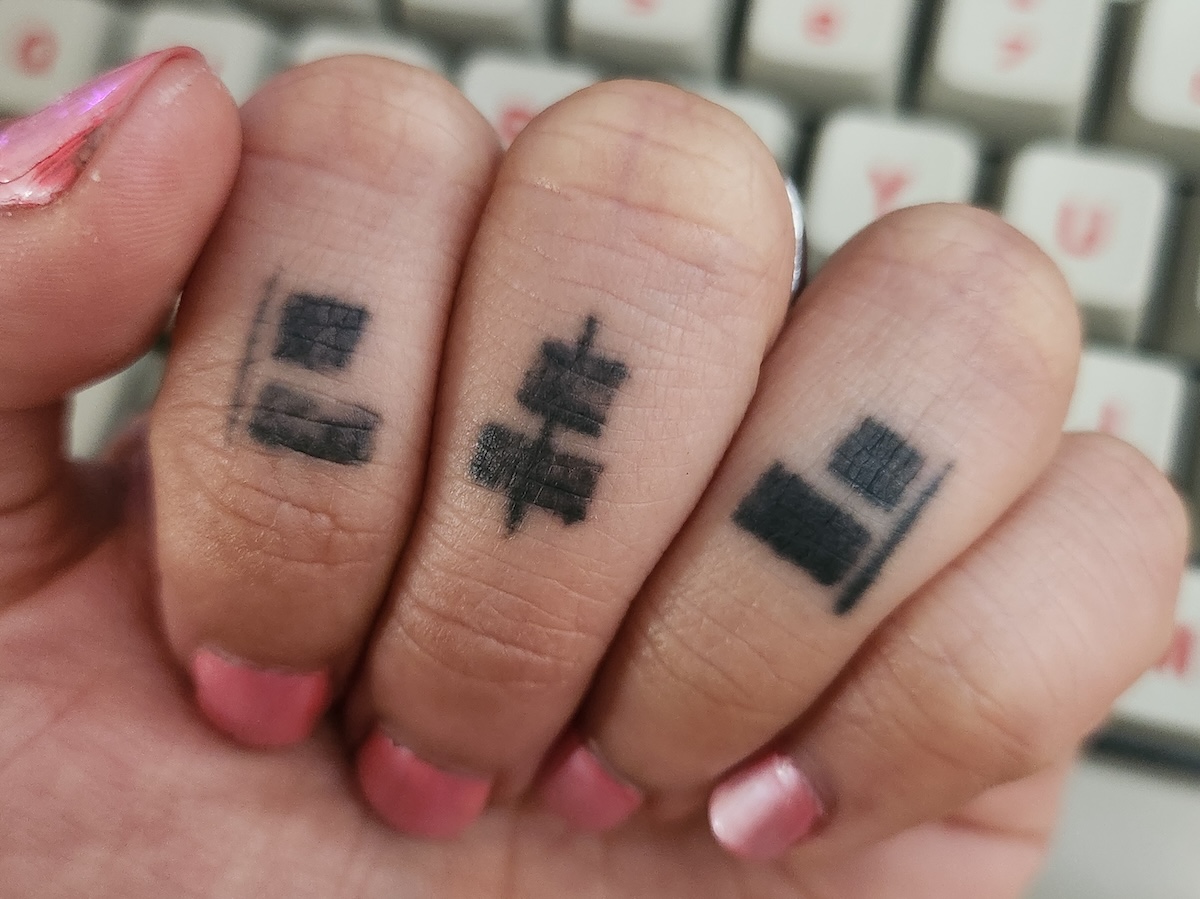
    This image above is fully healed from the first pass. As you can see, most of the ink fell out of my pointer finger tattoo and a significant amount fell out of my middle finger tattoo as well.

    The design wasn’t very defined at all. I knew at this point I would have to go in for a touch-up!

    Getting my finger tattoos touched up

    I waited three months (touched up on March 22, 2024) before I got my finger tattoos touched up. There wasn’t any reason I needed to wait that long other than the fact that it was snowboarding season, and I didn’t want to get them touched up and then have them rub around in gloves for the rest of the season.

    As for the pain, it was pretty comparable to the first time (horrible), but at least I went in knowing what to expect!

    My artist mentioned something about how my fingers were taking the ink much better this time, but still wasn’t confident it was going to heal perfectly.

    finger tattoos peeling

    This time, when it started peeling, I was pretty happy with the results. It still wasn’t perfect, but at least you can tell what they’re meant to be!

    Here’s a look at them fully healed the second time. There’s still that spot on my pointer finger that didn’t take the ink, but it’s significantly better than the first pass.

    second round healed finger tattoos with a small gap in the ink on the pointer finger

    How do my finger tattoos look today?

    It has been about a year since I got them touched up. They haven’t changed too much since they healed the second time.

    I have since gotten a bouldering gym membership, so there’s not a more extended period where I don’t want to use my hands.

    I still think I will get another touch-up at some point, but I’m not in a huge rush. I’ll update this post when it happens!

    final result of finger tattoos with a small gap in the ink on the pointer finger

  • Setting up your snowboard stance: don’t worry, it’s easy!

    Setting up your snowboard stance: don’t worry, it’s easy!

    You have all your equipment, now what?

    If you buy your snowboard equipment in a store, they’ll likely be able to set up your board for you.

    If you’d like to change the initial board setup or if you bought your equipment online, read on!

    I won’t be going into what hardware to use or how to screw bindings into your specific board. Look up your specific gear to find that information.

    Determining Your Snowboard Stance

    Stand with your feet a little wider than shoulder-width apart and do a few squats.

    Notice the angle of your feet when you are squatting, try with your feet straight and then again with your feet angled out.

    Whatever feels more comfortable is a good starting stance.

    Binding Directionality

    If you’re not interested in switch riding (riding with the opposite foot in front), try a non-symmetrical stance where your front foot is angled a bit further out.

    This is a good technique for beginners because this stance can help you initiate turns when first starting out.

    If you are interested in switch riding, you might want to have a symmetrical stance where both your feet are angled outward similarly.

    This is also known as the “duck stance”

    Example: I’m someone who enjoys riding regular and goofy, and I squat with a wide-angle stance, so my bindings are -15 (left) and +15 (right)


    Try it out, then make adjustments. If you are feeling discomfort, try a different stance. Everyone is different and has different preferences!

  • How do I know what snowboard gear to buy?

    How do I know what snowboard gear to buy?

    This is a quick-start guide for anyone who is looking to buy some snowboard gear.

    I’m going to start with some hard truth. Good gear alone won’t make you a better snowboarder.

    On the bright side, this also means that your gear won’t be the thing to hold back your ability to learn and it doesn’t really matter what gear you end up with (to a certain extent).

    Get the Facebook marketplace stuff if it aligns with your budget! Whatever gets you out on that snow.

    The only exception to this concept is boots. If you pick one item to splurge on, it should be your boots. You will have a better time with boots that fit you and fit you well. More on that later.

    Keep in mind that your personal experience should be valued above all else! There is no singular right way to buy gear. These suggestions are based on my own experience and should serve as a good starting point.

    drawn image of rosie snowboarding with her arms out

    How do I find a snowboard right for me?

    Easily the most overwhelming thing to shop for. Start off by determining your priorities for the board.

    Do you want a board that suits your riding needs? Or are you looking for a cool graphic? Ideally you end up with a board that fits both criteria, but that’s not always possible.

    If you are someone (like me) who prioritizes the graphic, this section is more for keeping at the back of your mind while you’re shopping rather than a guide! If it’s ugly, I won’t ride it (sorry).

    snowboard with the word "cool" on it


    A decent rider is likely able to handle all of these board types. Having it suit your exact riding needs isn’t as important as online forums make it seem!

    The most important items to consider are length and width. The rest is up to your preferences!

    How long should my snowboard be?

    A proper snowboard length depends on a combination between your height and weight.

    I’ve pulled a chart with information from evo so you can get a good idea of the range of lengths that suit you.

    Height (ft, in)Weight (lbs)Snowboard Length (cm)
    4′ 10″110-120128-136
    5′115-130133-141
    5′ 2″120-135139-147
    5′ 4″130-145144-152
    5′ 6″140-160148-155
    5′ 8″150-170152-158
    5′ 10″160-185156-162
    6′170-195158-164
    6′ 2″180-210160-166
    6′ 4″190+162+

    A longer board will give you more control on the hill and holds speed well, but if it’s too long, it might be difficult to initiate those turns.

    A smaller board is easier to turn, but less stable on the hill, especially at high speeds.

    In general, if you were to stand on flat ground next to a board, it should come somewhere between the bottom of your neck to your nose.

    rosie with a snowboard held up next to her to show the length of the board

    How wide should my snowboard be?

    Width is primarily based on boot size. Your boots should overhang the front and back of your board by 1-2 cms.

    You probably won’t notice if it’s off by a little. Not enough overhang could lead to a harder time getting on the edges, too much overhang means you risk catching your boots in the snow.

    Ideally, your toe and heel land right over the edges of your snowboard.

    drawing of a snowboard showing appropriate amount of boot overhang

    What snowboard shape best suits my riding?

    Twin tips

    Same cut on the nose and the tail, symmetrical. Good for switch riding, commonly seen in the terrain park.

    drawn twin tip snowboard

    Directional

    One side is clearly the nose and one side is clearly the tail. Great for high speed & carving.

    drawn directional snowboard

    Asymmetrical

    These can be viewed as specialty boards for people trying to hone in on specific skills. I won’t even pretend to know much about this category, so I’ll leave specifics out of the conversation here.

    drawn asymmetrical snowboard

    What is a snowboard camber and which camber is right for me?

    (“cam” like camera & “brr” like it’s cold out)

    The camber refers to the side profile of a snowboard.

    Types of camber and their applications:

    Camber Profile:

    4 touch points in the snow on the corners, center is lifted. Good for carving.

    graphic showing what parts of the board touch the ground in a camber profile

    Reverse-Camber Profile (Also known as Rocker):

    center is touching the snow, the corners are lifted up. Harder to catch edges. Good for park riders.

    graphic showing what parts of the board touch the ground in a reverse-camber profile

    Hybrid Profile:

    Has a mix of camber and reverse-camber, best of both worlds! The degree of each camber in a board may vary and that’s true for all of the options listed.

    graphic showing what parts of the board touch the ground in a hybrid profile

    How much flex should my snowboard have?

    Soft Flex:

    Good for park, butters, easier to turn. Not as good for speed and carving.

    drawing showing a soft flex board

    Stiff Flex:

    Good for carving, harder to initiate turns as a beginner, more stable on the hill, built for speed.

    drawing showing a stiff flex board

    Medium Flex:

    Middle ground between soft and stiff flex, multi-purpose option.

    drawing showing a medium flex board

    What to look for in snowboard bindings

    Despite being the things that keep you on your board, the bindings are way less complicated to shop for than the snowboards themselves.

    There are probably more options than what I’ve gathered here, but these are what I’ve been seeing recently. They all have their pros and cons.

    Types of bindings and how they function:

    drawing of a two-strap snowboard binding

    Two-Strap Bindings:

    Pros:

    • Most affordable option
    • Secure
    • Any boots fit

    Cons:

    • Tiring to strap on and unstrap for each run
    drawing of a step-in snowboard binding

    Step-In Bindings:

    Pros:

    • The easiest in/out. There is no need to bend down at the top of the hill.

    Cons:

    • I’ve heard first hand that any powder makes this option difficult since snow easily gets in the way.
    • Pricier option
    • Requires special boots so you’ll need to check compatibility.

    Neutral:

    • Requires some balance

    drawing of a supermatic snowboard binding

    Supermatic Bindings:

    Pros:

    • Easy In/Out – no need to bend down at the top of the hill
    • Any boots fit

    Cons:

    • Pricier end, the brand that sells these kind of owns the whole market

    Neutral:

    • Requires some balance
    • Can be thought of as the automatic version of flow bindings.
    drawing of a flow snowboard binding

    Flow Bindings:

    Pros:

    • Relatively easy in/out but you need to bend down to get secured.
    • Any boots fit

    Neutral:

    • Priced between two-strap and step-ins
    • can be thought of as a manual version of the supermatics

    What to look for in snowboard boots

    It’s important to get boots that fit you. Used boots may work, but comfortability may be impacted if the soles are already worn in by someone else. Highly recommend buying new, if possible.

    How should a snowboard boot fit?

    Street shoe size does not necessarily translate directly to snowboard boot size. I’ve found that Burtons run about a half size too small.

    Here are some things you should look for when trying on boots. When you’re standing upright, your toes should barely touch the front of the boots. When your knees are bent, your toes shouldn’t pull significantly away from the front of the boot.

    drawing of appropriate boot fit

    The types of laces on a snowboard boot

    drawing of classic snowboard boot laces

    Classic Laces

    Pros:

    • Easy to repair

    Cons:

    • Need to manage excess laces
    • Depends on your strength for tightness
    drawing of boa snowboard boot laces

    Boas:

    Pros:

    • Lifetime repair warranty
    • Easy tightening
    • Easy release

    Cons:

    • Higher in price
    drawing of quick-pull snowboard boot laces

    Quick-Pulls:

    Pros:

    • Faster than laces

    Cons:

    • Need to manage excess laces
    • Depends on your strength for tightness

    Quick-pull boot laces tip! Wind the excess around the handles before tucking them in the handle pockets.

    wind excess around the handles and tuck it into the handle pocket

    All of this is personal preference, boas are going to be the easiest to use since the tightening method doesn’t depend on your strength. They’re also likely to cost the most!

    Stiffness

    Soft:

    • Good for park
    • Easier on your feet
    • Lots of maneuverability

    Stiff:

    • Responsive
    • Good for carving & resort riding
    • Good for high speeds

    Medium:

    • You guessed it, mix of both!

    I hope this little guide has been helpful. But again, your experience is the most important thing you can add to your knowledge base. Have fun out there!

    The next step is determining how to set up your snowboard bindings.

    Even after 15 years of snowboarding, I still learn many new things each season. If you have any questions or suggestions on how to make this a better guide, email [email protected]